Whereas I think, understanding the objects used in the presentation and looking at the Wireframe view in Figure 1.1 is more than enough to know the basic fundamental used behind this Handwriting Text Effect Animation in PowerPoint.
Only Disappear (Exit Category effect) and Appear (Entrance Category effect) have been used.
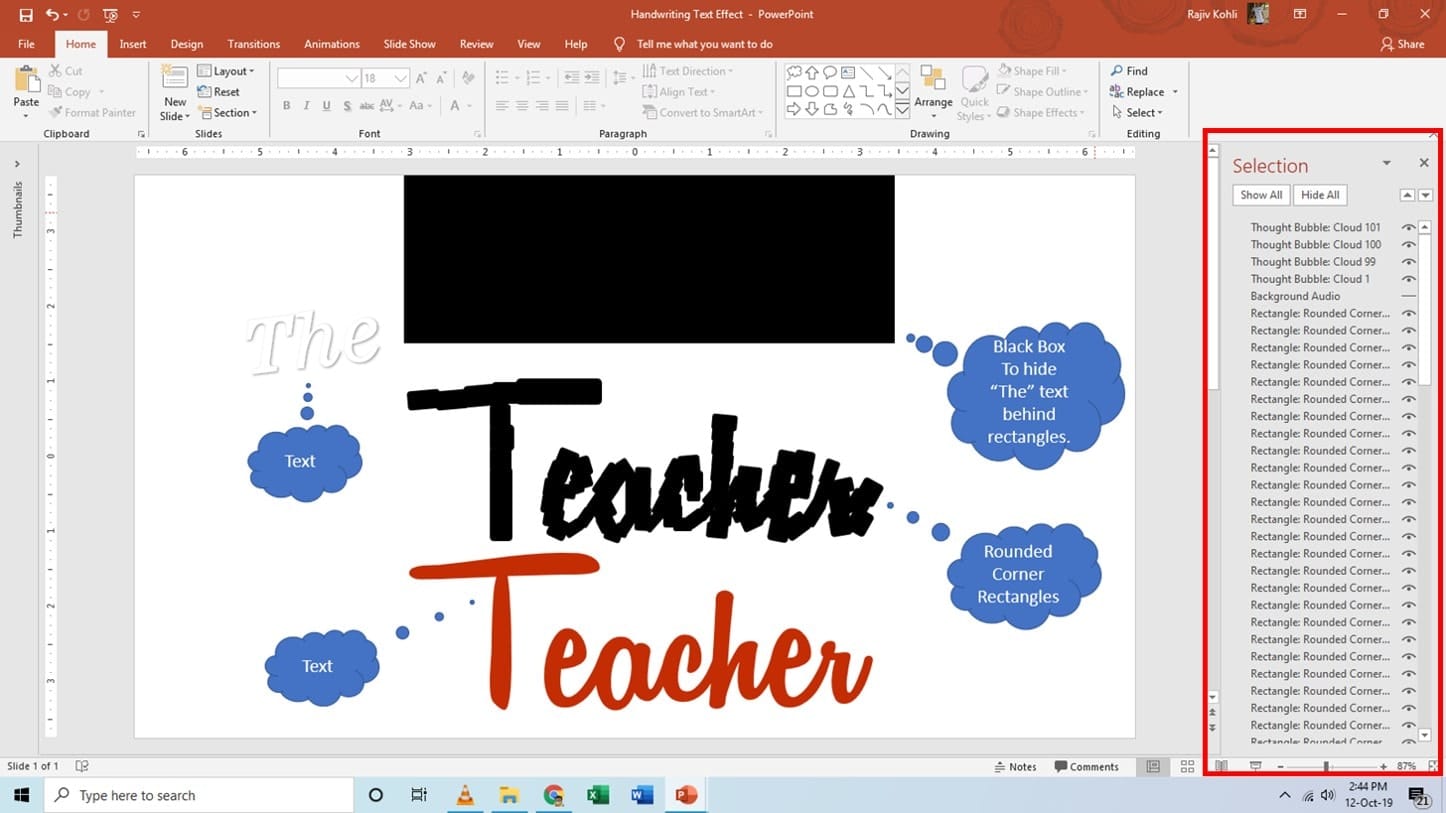
The background color has been changed to white, so you may see all the objects.
The Selection Pane is showing a huge list of Rounded Corner Rectangle shapes used to overlap the “Teacher” text. There could be some other possible ways to create this Handwriting Text animation in PowerPoint. I just thought of using this trick to accomplish the desired effect. Not very much realistic animation because #ListenMicrosoft there is no Masking Tool available in PowerPoint.
Basic Animations Used in Handwriting Text Effect
- The idea behind this effect is simple. I draw so many Rounded Corner Rectangles over the “Teacher” text and covered it entirely by placing the rectangles almost in a similar manner as the text was written. Disappear Exit effect has been applied on each of the rectangles having a bit of delay between each Disappear effect.

In the Presentation, the entire text has been covered by placing shapes exactly in the same position. For illustration purposes, the red-colored text has been placed with a slight difference.
- Then the Black Rectangle has been placed behind all the Rounded Corner Rectangles and Red-Colored Text.

- Even this Black Box is behind the Rounded Corner rectangle and Text but still, you only see the box alone. The color of this box and rounded corner is similar and Red-colored text is also hidden behind the shapes. That is why you only see this black box.
- Text “The” is behind all the other objects on the slide, hidden behind the Black Box. We used the Peek In Entrance effect for this text. So, if you will not cover the rectangles and text with this black box then the effect will look like as shown in Figure 1.4:

- You can clearly see that it seems very odd as the text “The” can be seen peeking in from behind the text “Teacher”. Covering with Black Box will make this effect a bit more realistic. See Figure 1.5:

If you have read or watched my previous tutorials then you might know that I mostly use “Start – With Previous” for all the effects in a Presentation. In Figure 1.5, you can see that the Rounded Corner Rectangles are Disappearing one by one in 3 seconds and then text “The” Peek In from behind.
Understanding “Start With Previous and After Previous”
In very few of my presentations, I used the “Start – After Previous” for effects. In this presentation, it was completely necessary to Start all the animations one after another. Like, the first rounded corner rectangle will disappear with a Delay Timings of 0.50 Seconds. Then we want each of the next Rectangles to disappear after a short delay of 0.02 seconds.
There are maybe more than 100 Rounded Corner Rectangles over the text and we want each of the rectangles to quickly disappear after a short delay of 0.02 seconds.
Tip: Appear and Disappear effect Duration is set to Auto by default. Time Duration value doesn’t matter for both of these animation effects as any object will Appear or Disappear immediately. Only the Delay Timings matter that when you want an object to appear/disappear.
- Select All the Rounded Corner Rectangles and apply the Disappear effect, Start – After Previous with Delay Timings 0.02 Seconds. All the effects will immediately have a 0.02 Seconds Delay to each other. That way, each Rectangle will start disappearing after 0.02 seconds which will create our “Handwriting Text Effect”.
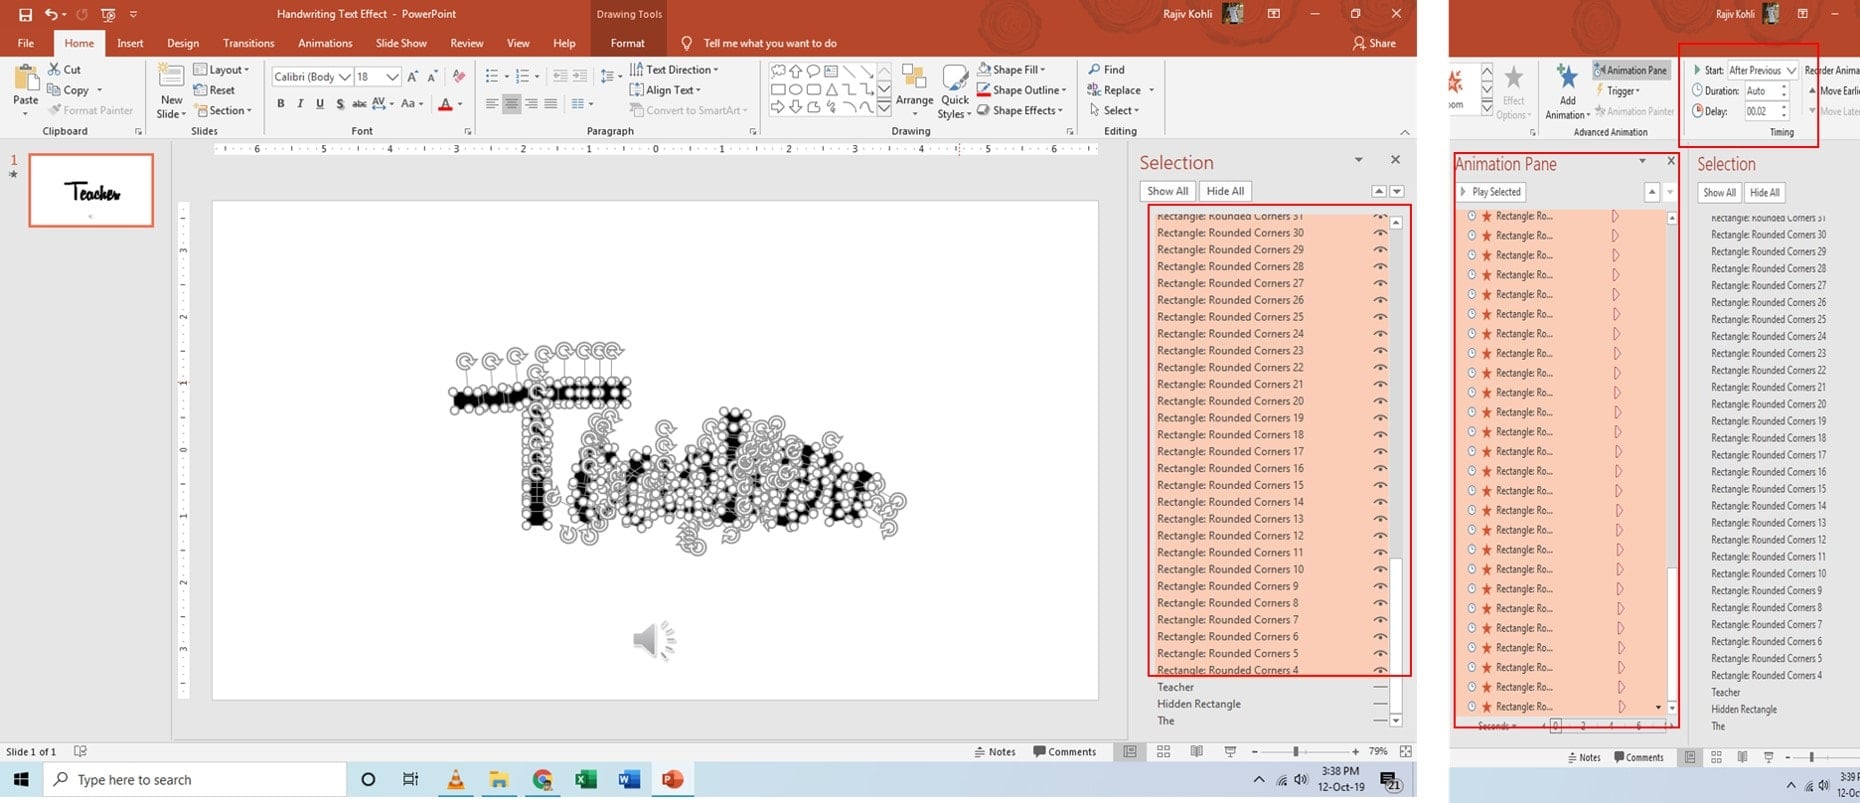
Selecting all those rectangles alone is not an easy task #ListenMicrosoft as the Selection Pane doesn’t support Continuous Selection by holding the Shift key. Only non-continuous selection is allowed using CTRL Key which can take ages to select all those rectangles.
Tip: Hide all of the other objects by clicking on the Eye-button in Selection Pane and then press CTRL+A to Select All the rectangles. After applying the animations press the eye-button again to back them visible.
If you will use “Start – With Previous” then you have to manually add a delay to each of the animations in 0.02 Seconds for the 2nd Rectangle, 0.04 Seconds for the 3rd, and so on. Only in these cases, applying After Previous can save you a lot of time.
I hope you got The Teacher Point.
Watch Handwriting Text Effect in PowerPoint Tutorial
The article How To Make Handwriting Text Animation also applies to the following versions:
- PowerPoint 2007
- PowerPoint 2010
- PowerPoint 2013
- PowerPoint 2016
- PowerPoint 2019
Download Handwriting Text Animation PowerPoint Presentation (PPT)
PPT Info
PowerPoint Presentation
File Type: PPT / PPTX
File Size: 154KB
Number of Slides: 1
Effect: Animated Handwriting Text Animation