
Animation #PossibilitiesWithPowerpoint is what this Lower Third Animation in PowerPoint Tutorial is all about. We are using a Green Screen Background as PowerPoint doesn’t support Transparency when you export your presentation as an MP4 video.
Turn On Volume
About the Lower Third Animation
- We used 6 Rectangle Shapes, 3 Text Layers, and a Music file. There are a total of 8 Entrance, 2 Emphasis, and 8 Exit Effects that have been used in this presentation.
- The first 3 rectangles: Red, Green, and Blue are the first to appear on the screen during the slideshow. We used Fly-in Entrance effects with Red rectangles having a Duration Timings of 1.15 Seconds, Green rectangles with a Duration of 1.25 Seconds, and Blue rectangles with a Duration of 2 Seconds.
- The stop position of the above 3 rectangles is exactly the same. Each rectangle Flying In from the left of the screen and the difference between their duration timings creates an overlapping effect. It is a bit different in their entrance timings but there is no Delay between the effects. The difference between their Duration is behaving like Delay Timings.
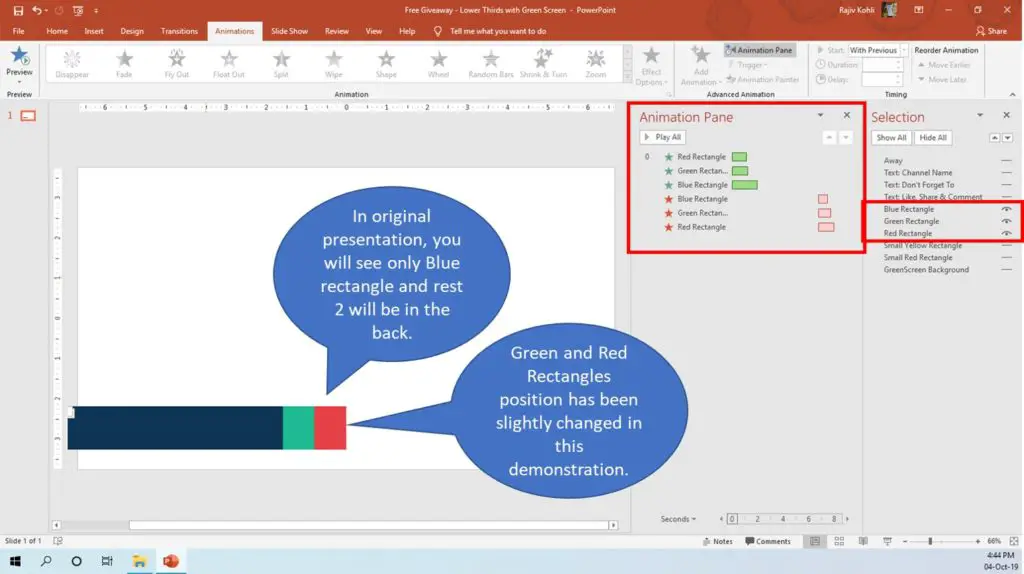
- The position of the rectangles has been slightly changed in Figure 1.1 to show you 3 different color rectangles.
The Animation Pane is showing a total of 6 effects: 3 Fly-in Entrance and 3 Fly-Out Exit effects. The Delay Timings between the Entrance and Exit effects are 6.75 Seconds.
The Fly-out Exit effects are in Ascending Order where the Blue Rectangle has a Duration of 0.75 Seconds, the Green Rectangle is 1 Second, and the Red Rectangle has a Duration Timings of 1.25 Seconds. Blue will move out of the screen first and then Green and Red Rectangles will follow. The Entrance Fly-in effects are in Descending Order where Red comes first and then Green and Blue Rectangles follow. - Using the Eye button in the Selection Pane, you can hide the rest of the objects on a slide except Rectangles and then see the Slideshow. You will see Red Rectangle coming first, then Green and Blue following. After a delay of 6.75 Seconds, the Blue will fly out first, and then Green and Red will follow him.

Figure 1.2

Figure 1.3
- After the Blue, Green, and Red Rectangles entrance effect, you see the Like, Share, & Comment text. We again used the Fly-in Entrance effect for this text. Duration is 0.75 Seconds and Delay is 0.25 Seconds, so it will be following the rectangles. Look at the Effect Options Properties window of this text effect in Figure 1.4:
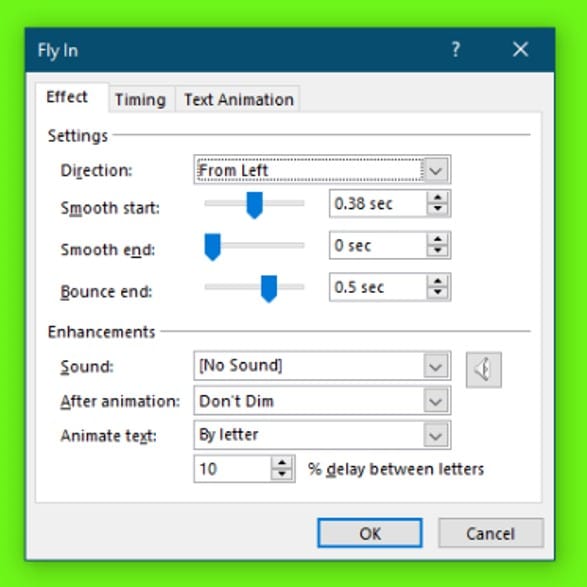
- Along with the Start Smoothness and Bounce End, we also changed the Animate Text to By Letter with a 10% Delay Between Letters. Then the text stays there for up to 6.75 Seconds and then Fade Out letter by letter. We use the 5% Delay Between Letters effect option for the Fade Out effect.
- For the Small Yellow and Red Rectangles, we used the Peek In – From Left effect which has a Delay Timing of 1.10 Seconds. It appears when the first text is coming from the left and the Blue rectangle is still passing the path.
- Text Channel Name and Text Don’t Forget To: both appear at the same time with their corresponding rectangles having Zoom in Entrance effect with Effect Options set to Animated text By Letter with a 10% delay between letters.
- We also applied the Grow / Shrink effects to the above text objects with 120% Grow with Auto Reverse.
- The first object to move out of the screen is the Like, Share, & Comment Text having a Fade Out Exit effect with a Delay Timing of 5.50 seconds.
- For Text: Don’t Forget To and Text: Channel Name, we used Zoom Out with effect options having a 5% Delay between letters.
- Then the Small Yellow Rectangle Peek Out To Top and Small Red Rectangle Peek Out to the Bottom.
- For the rest of the Blue, Green, and Red Rectangles; we used the Fly Out Exit effect to the Left.
- Once you have the final Lower Third Animation, you can then export your PPT to MP4 with Green Screen Picture in the background.
- Click on the File Menu in PowerPoint 2013 / 2016 and 2019 and then click on Export, Create a Video, and then after setting the Resolution and other options, click on Create Video button.
To Remove the Green screen you can watch our video tutorial embedded below from 8:00 minutes onward, where we are using Camtasia Studio to remove the green screen and to overlap this lower third animation on other videos. You can also watch our video tutorial on How To Remove Green Screen in After Effects.
I hope you got The Teacher Point.
Watch Lower Third Animation in PowerPoint Tutorial
The article How To Lower Third Animation also applies to the following versions:
- PowerPoint 2007
- PowerPoint 2010
- PowerPoint 2013
- PowerPoint 2016
- PowerPoint 2019
Download Lower Third PowerPoint PPT
PPT Info.
PowerPoint Template
Lower Third Animation
File Type: PPT / PPTX / ZIP
File Size: 5.45KB
Number of Files: 4
Number of Slides: 1
Download LOWER THIRD ANIMATION POWERPOINT TEMPLATE
DON’T FORGET TO LEAVE A RESPONSE.