
Introduction
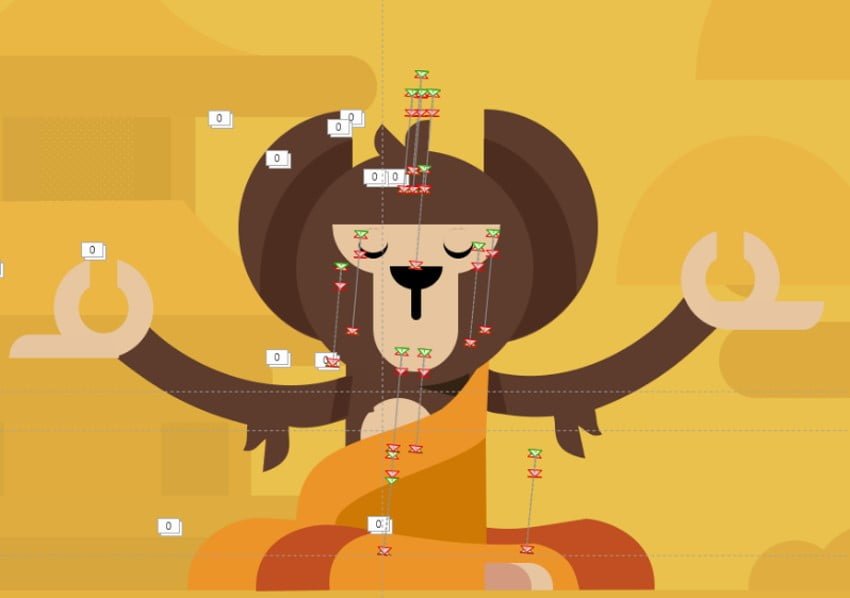
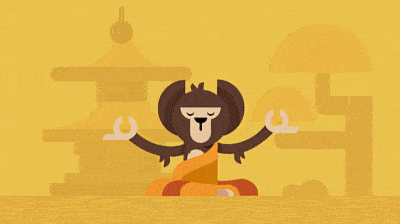
A short character animation – Monkey Animation in PowerPoint, where the Monkey is in a meditative state and starts floating in the air and then falls down. He then starts floating in the air but as soon as the music skips, Gravity attracts him and he then again falls.
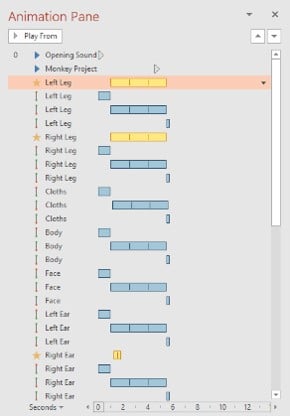
The total duration of this animation is 5.75 seconds but it can take you hours to create and watch the results. Look at the Selection Pane and the list of grouped objects used in this presentation.

Arrows indicate these are Group of more than one shape layer.
Original animation inspiration from
Formas Studio Monkey Animation
Monkey Design
We used Shape Tools alone to draw this entire scene. For beginners, who are interested in making this entire animation from the very beginning; always keep in mind that Graphics Designing takes most of the time and sometimes even more than animating the entire scene. Now, take a look at the list of animations applied to the objects.
All most same Motion Path effects on all objects except Spin.
“The focus of this post will be on explaining the fundamentals of techniques used in this presentation.“
When looking at a Flat 2D Animation running on the screen then always look at the objects that are in motion. The Animation Pane is clearly explaining that which objects in this presentation have the animation effects Left Leg, Right Leg, Clothes, Body, Face, Left Ear, Right Ear, Hair, Third Eye, Left Arm, Right Arm, Right Eye Cover, Left Ear, and Left Eye Cover.
Also, note that almost the same animations have been applied to the rest of the shape layers. So, I will explain the Left Leg animations alone and then you can use Animation Painter to replicate the same effects on the rest of the layers.
The point is: during the graphics design of a character or a scene, you should always draw those objects separately which will be in motion during the slideshow. So, all the parts of the monkey which are in motion have been drawn and grouped in separate shape layers as shown in Selection Pane.
Understanding the Monkey Animation Effects
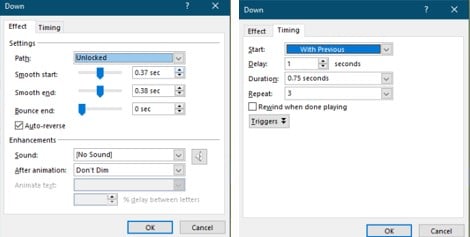
- We applied 4 animations on the Left Leg and take a look at the first animation having a Yellow Star with Yellow Bar in the timeline further divided into 3 parts, indicating that the SPIN Emphasis effect has been used with 3 Repeats. Double-clicking an effect in the Animation Pane will bring up the Effect Options Properties window and from here you can see further options applied to the same effect.

For instance, in the Effect tab, you can see that 3 Degree Counterclockwise Rotation has been applied with Auto Reverse and without any Smoothness. In the Timing tab, the Start animation is set to With Previous with a Delay Timing of 1 Second, Duration of 0.75 Seconds, and 3 Repeats.
If you hide all the objects on the slide except the Left Leg using the Selection Pane and then play the Slideshow. You will see that the Left Leg will start rotating in 3 Degree Counterclockwise direction and will take 0.75 seconds to cross that much distance but after 1 second of pressing the Slide Show button because of Delay Timing.

It will further take 0.75 seconds to turn back to the same position from where it started rotating because of the Auto Reverse option. So, one loop of this animation will take a total of 1.50 seconds to complete because of the Auto Reverse. During the slideshow, all the above effect options will get repeated 3 times.
- The next animation is Up Motion Path on Left Leg without any Delay Timings. Whereas the above Spin effect has 1 second Delay Timing. So, the second effect Up Motion Path will begin first, and when the leg will in the air, it will start spinning. We defined very short Motion Paths, so you might need to Zoom up to 400% as PowerPoint is not good when defining short motion path lengths.
- The effect Options window also shows that Start Smoothness of 1 Second has been applied without Auto Reverse and the duration of this effect is 1 second. So, the Left Leg will smoothly move upwards, traveling up to the length of the Motion Path, and will then stay there because of No Auto Reverse.
The 3rd Animation is Down Motion Path, which will begin after the Up Motion Path has 3 loops. That is the reason, we didn’t apply Auto Reverse on the 2nd Up Motion Path because the animation requires different Effect options for this path.
- Take a look. The default Smoothness of 0.37 Seconds for the Start and 0.38 Seconds for the End, which is half the timing of the total duration of 0.75 seconds. We are also Auto Reversing the effect with a 1-second delay. So, when the leg will start spinning, at the same time it will start moving downwards having 3 repeats of down and up moves.
We again used the Down Motion Path to create the monkey fall effect when the music skipped. The duration of this animation is 0.25 seconds which means the monkey will fall at a higher speed. The Delay timing is 5.50 seconds which is the time when the music stops playing. The length of this 3rd motion path is touching back to the ground, whereas the 1st motion path will take the monkey into the air and 2nd will make him float in the air.
Use Animation Painter To Copy Effects
- Then you can take the help of Selection Pane and Animation Painter to replicate the same effects on the rest of the objects.
- The third-eye covers (hide the rest of the objects except the Left Eye Cover and Right Eye Cover and see the slideshow) are also moving along with other parts. Because of the Wipe Exit effect, both the covers get disappeared in 2 seconds to reveal the third eye. To shut the third eye again when the monkey falls back, we used the Wipe Entrance effect at 5 seconds.
I hope you The Teacher Point.
Watch Monkey Animation in Microsoft PowerPoint Tutorial
The article How To Monkey Animation also applies to the following versions:
- PowerPoint 2007
- PowerPoint 2010
- PowerPoint 2013
- PowerPoint 2016
- PowerPoint 2019
Download Chintu Pintu PowerPoint PPT
PPT Info.
PowerPoint Template
Monkey Character Animation
File Type: PPT / PPTX
File Size: 252KB
Number of Slides: 1
Download MONKEY ANIMATION POWERPOINT TEMPLATE
DON’T FORGET TO LEAVE A RESPONSE.