
Have you ever been in a rush to prepare a table for an important office meeting or presentation? Microsoft Word offers an array of features that can help you quickly and beautifully format your tables. In this tutorial, we will walk you through the steps to design and format tables in Word, ensuring that your data stands out and impresses your audience.
Introduction
In our previous Microsoft Word tutorial videos, we’ve covered the basics of creating and converting tables. In this video, you’ll learn how to take your tables to the next level by customizing their design and formatting.
Choosing a Table Style
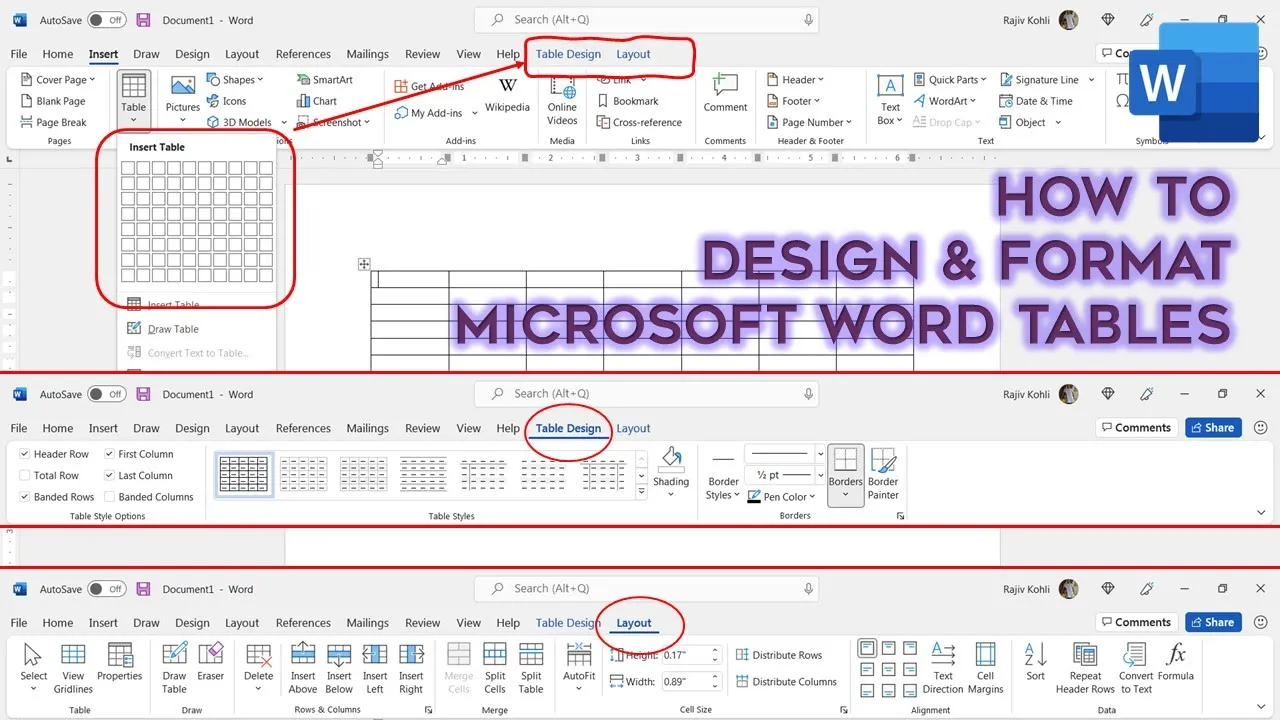
By default, when you insert a table in a Word document, it’s given the Table Grid style with dark black lines. But Word offers a variety of predefined table styles. Here’s how to choose the one that suits your needs:
- Place your cursor inside the table.
- Hover your mouse over the Table Styles to see a live preview.
- Click the drop-down button to access a vast list of ready-made table styles.
You can choose any style that you prefer. For example, we’ve selected “Grid Table 4 – Accent 5” for this demonstration. In an instant, your table will be automatically redesigned to match the chosen style.
Customizing Table Style Options
If you want to fine-tune your table’s appearance, Word provides several customization options under Table Style Options. Let’s explore what each of these options does:
- Header Row: If your table has a header row, this option gives it a different color and style, making it stand out from the rest of the rows.
- Total Row: If your table’s last row contains a total sum of values, checking this option will apply a double border to separate it.
- Banded Rows: This option alternates row colors, making every second row slightly darker for improved readability. Unchecking it will make all rows look the same.
- Banded Columns: Similar to Banded Rows, this option alternates the background color of every second column.
- First Column and Last Column: These options automatically apply the Bold command to the contents of the first and last columns, respectively.
You have the flexibility to choose which options to apply based on your table’s structure and your preferences.
Shading for Fill Color
If you want to experiment with background colors within your table, you can use the Shading option in the Design tab. Here’s how:
- Click the drop-down button.
- Choose a color to instantly apply it to the selected cells.
Remember that shading applies only to the selected area, whether it’s a single row, column, or the entire table. If you fill the entire table with a single color, some of the Table Style Options may no longer be effective.
Customizing Borders
To tweak the borders of your table, Word provides various border styles, including Solid Line, Double Line, and more. Here’s how to customize your table’s borders:
- Click the Border Style drop-down button.
- Select the desired border style.
- Use the Border Painter tool to draw lines over the borders you want to change. You can adjust the style, color, and width of the borders.
You can also add or remove borders using the Borders button. For instance, to remove all borders from the entire table, select the table and choose “No Borders” from the Borders drop-down menu.
For more advanced border customization options, stay tuned for our upcoming lesson.
Conclusion
We hope you found this tutorial on designing and formatting tables in Microsoft Word helpful. These features can be a lifesaver when you need to quickly create a polished table for your presentations or documents. If you have any suggestions or comments, please leave them in the comments section below.
Don’t forget to like the video and share it with your friends. Thank you for watching, and take care!