
Even though the 3D DNA Animation in PowerPoint video tutorial is 15 minutes long but I will try to cover everything in short in this blog post.
The first thing is that you might need to have Windows 10 and Office 365 on your system if you want to draw your own Custom 3D Objects in Paint 3D and later want to animate them in PowerPoint. Paint 3D is available with Windows 10 and 3D objects are available only in PowerPoint 365, 2021, 2019, and 2016. You can read more about How To Use 3D Objects in PowerPoint in this article.
So, before you begin, you can first go to the Insert tab and see if the 3D Models drop-down menu is available there as shown in Figure 1.1:
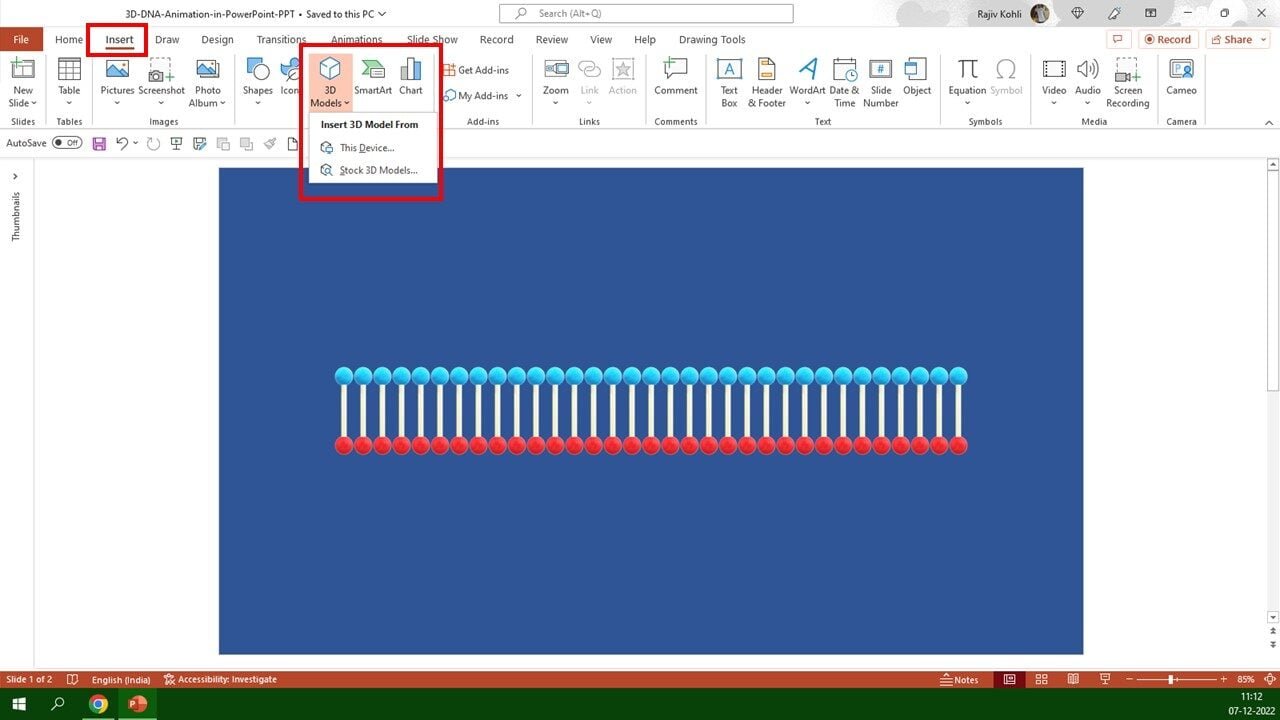
Showing 3D Models drop-down menu under the Insert Tab
You can also check the PowerPoint version installed on your system by clicking the File menu and then choosing Account.
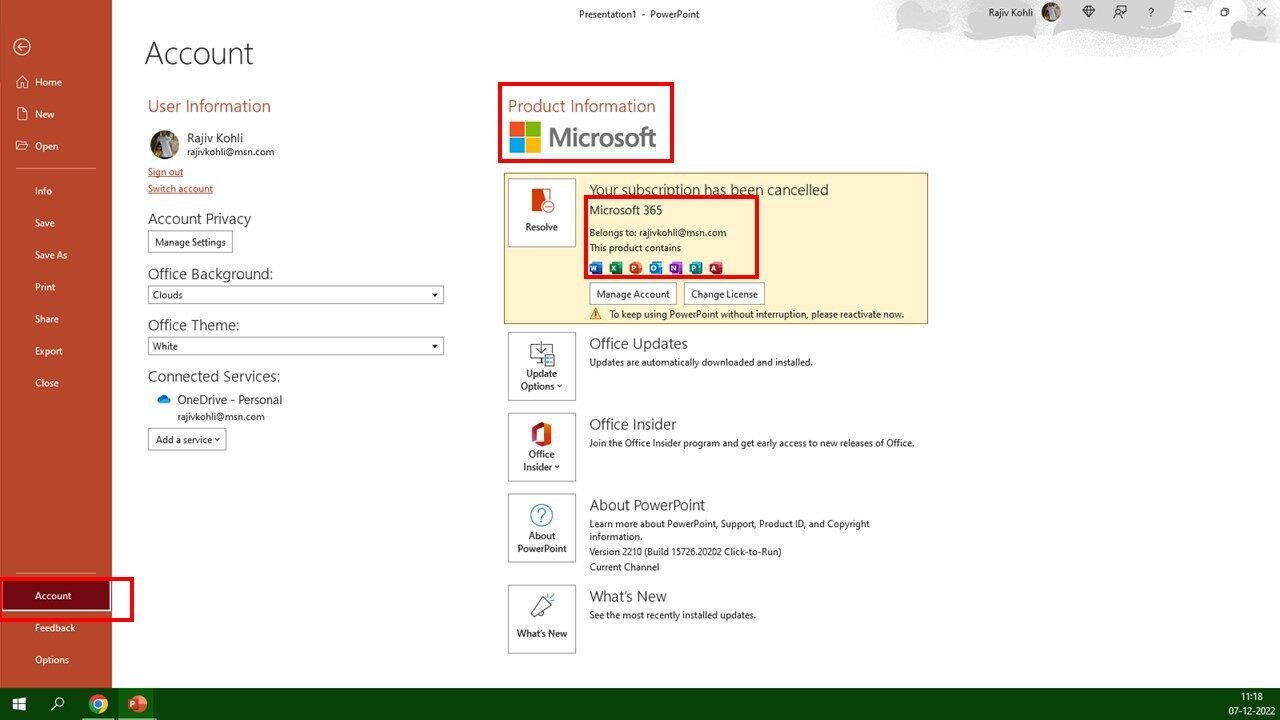
PowerPoint Version Check
The Stock 3D Models option under Insert 3D Models gives you access to an Online 3D Models library from where you can choose various pre-animated and still 3D Models. Do remember that you cannot customize the 3D Model itself in PowerPoint and you cannot also customize the pre-defined animation effects applied to them. You can freely rotate them, can choose a pre-defined scene, or can also apply pre-defined 3D animation effects.
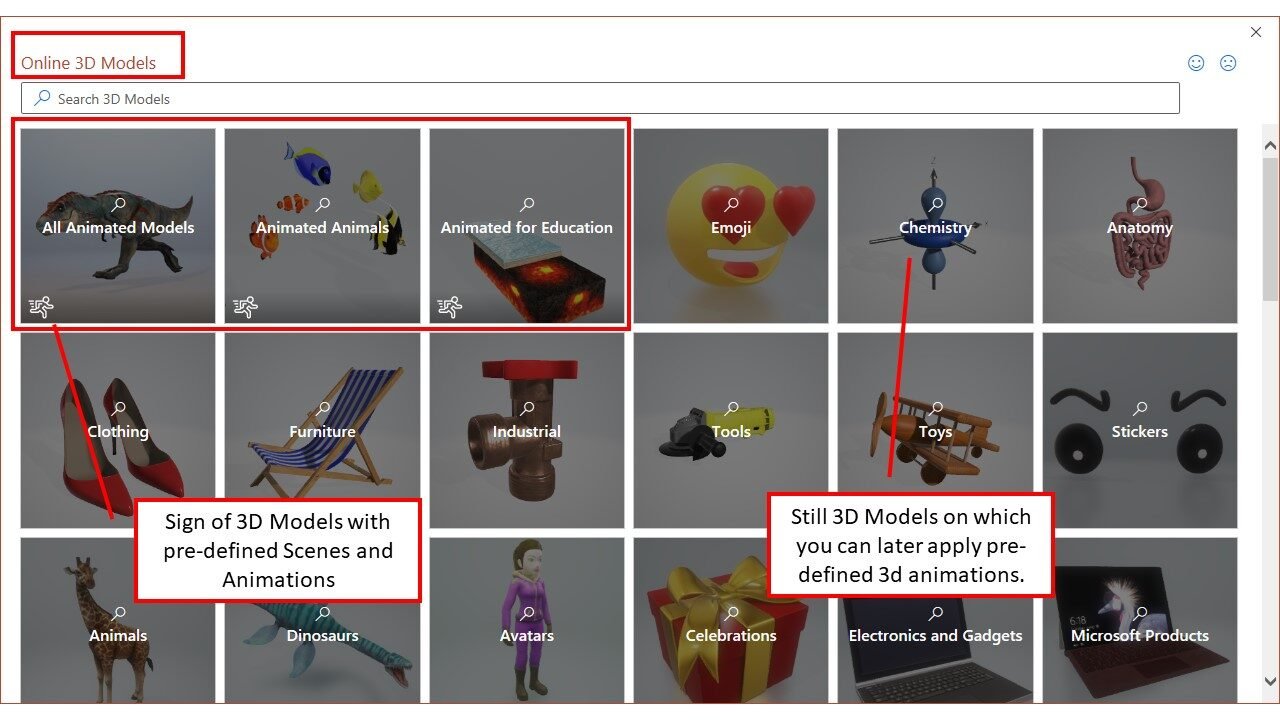
Shows both the animated and still 3d models available in the library.
For instance, the following 3D Dinosaur object is having 5 different scenes and you can also apply 5 different 3D Animation effects from the Add Animation drop-down menu of the Animations tab as shown in Figure 1.4 and Figure 1.5. You can also read our article How To Make A 3D Dinosaur Animation to learn more about how to use 3D Models in PowerPoint.
Figure 1.4
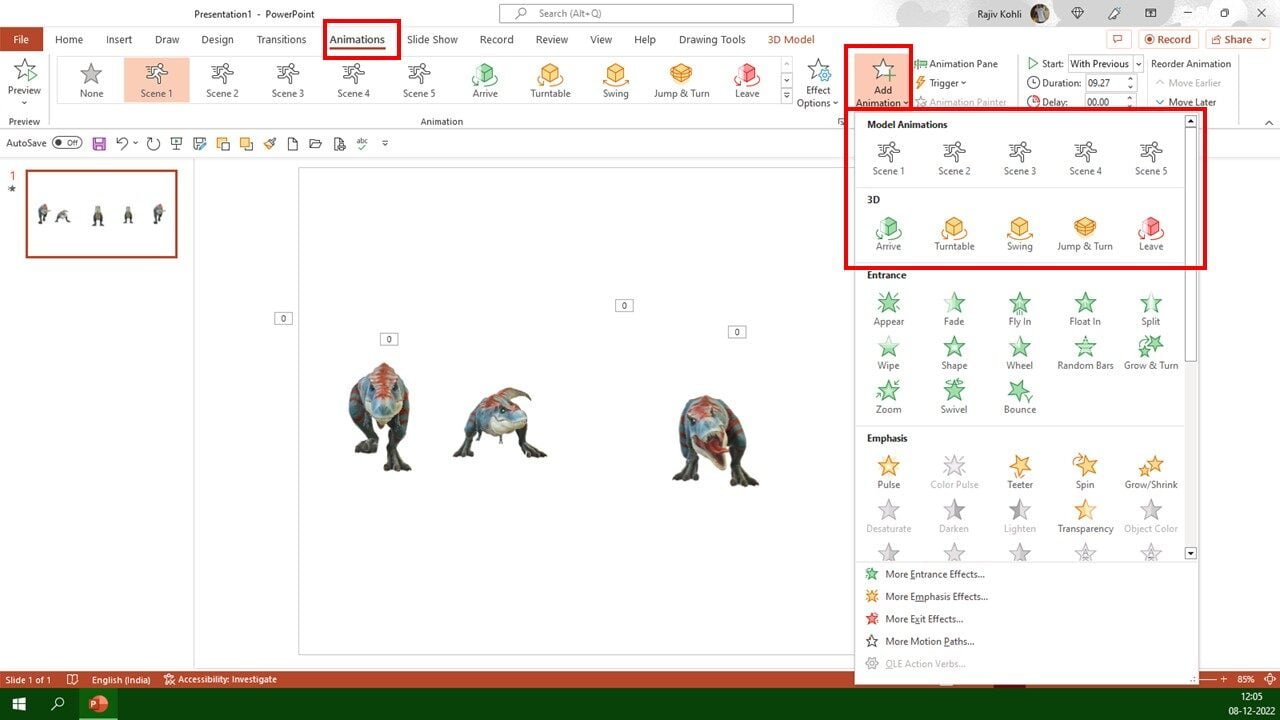
Figure 1.5
We used Paint 3D to create our own Custom Single DNA String and saved the file as a 3D Model in .glb file format. You can also download the Single DNA String Paint 3D File from the link below and can open that file in Paint 3D to investigate that how we have drawn the string.
In Figure 1.6, you can see the Single DNA String 3D Model View in both 3D Viewer and Paint 3D. We used Paint 3D tools to create a single DNA string and then later in PowerPoint, we can create as many duplicates as we need.
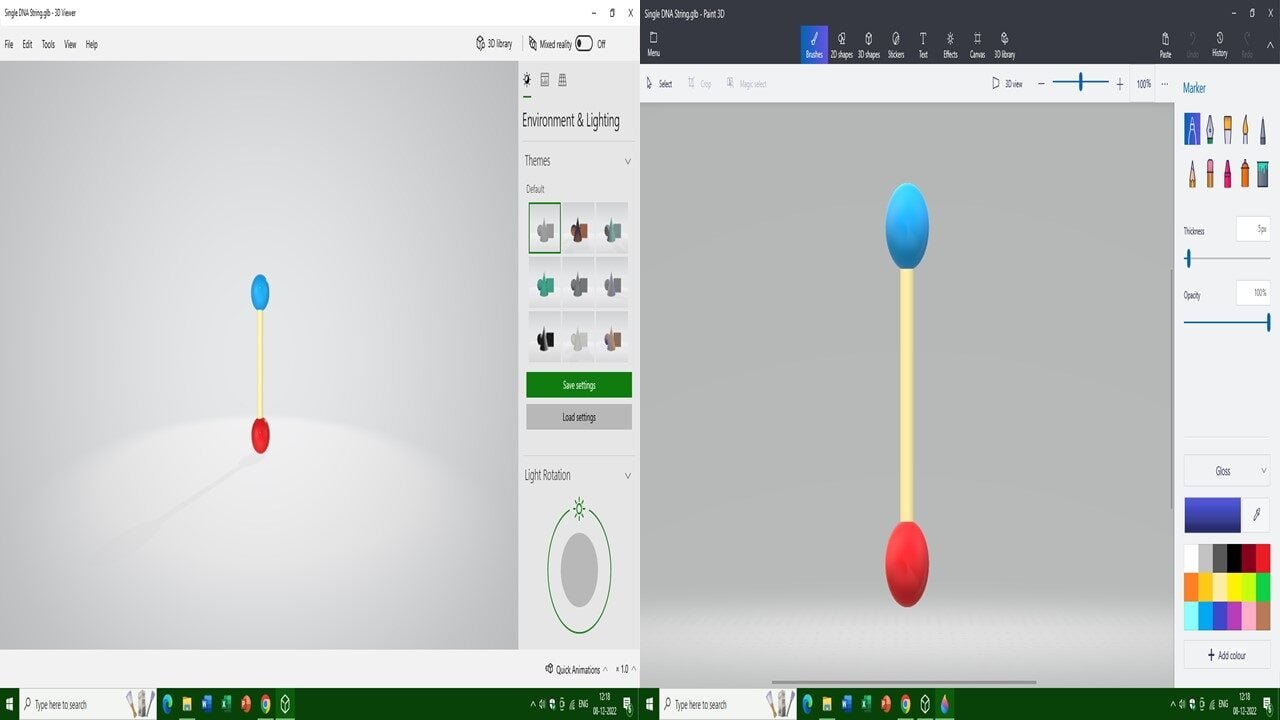
Figure 1.6
So, once you have the custom 3D Model ready to be inserted into the PowerPoint slide then you can use the This Device option from the 3D Models drop-down menu of the Insert tab. Then browse for the location where you saved or download the Single DNA Strip 3D Model file.
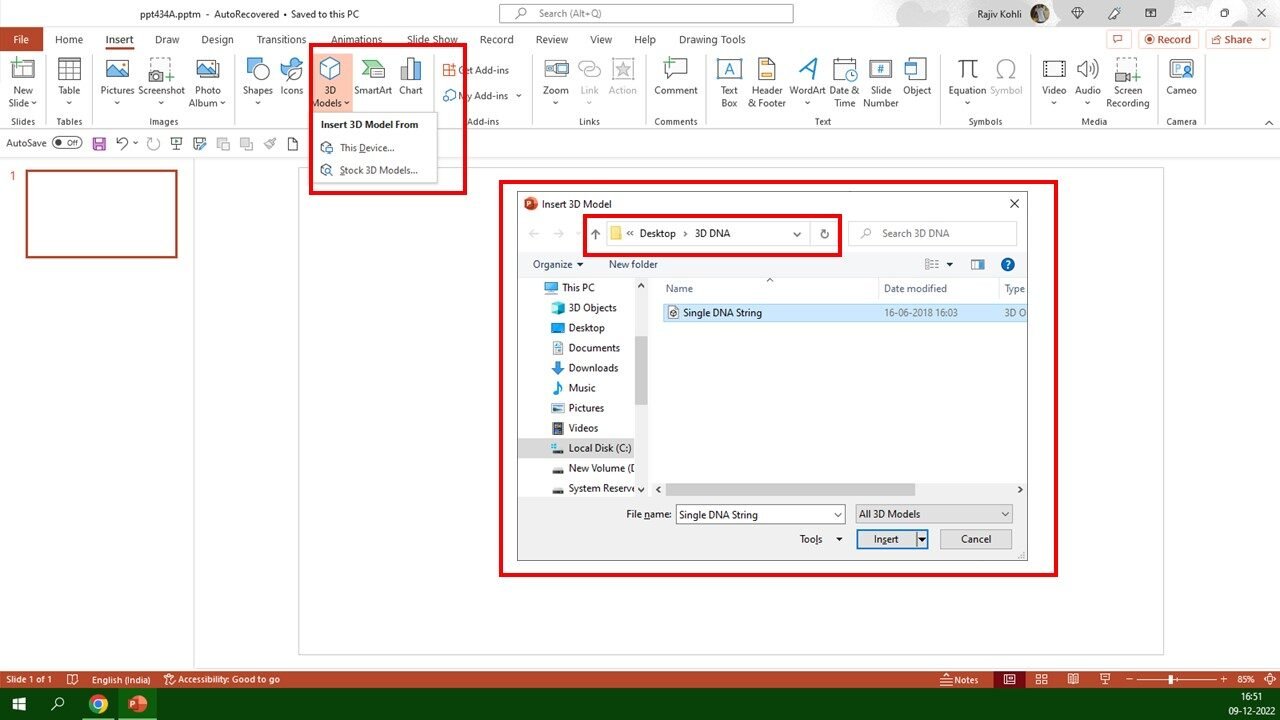
Figure 1.7
- Inserting Custom 3D Models: Go to the “Insert” tab, select “3D Models,” and choose “From a File” to insert your custom 3D model created in Paint 3D. Ensure your model is saved in the GLB format for compatibility.
- Adjusting Model Size: Properly size and align your 3D model in the center and middle of the slide. Use the Shift key for precise alignment.
- Animation Options: Decide whether you want to apply animations before or after duplicating objects. The choice affects the animation management.
- Applying Animations: If you choose to apply animations first, head to the “Animation” tab and select the “Add Animation” dropdown. Explore the 3D animation options, such as “Turntable” and “Pulse.”
- Fine-Tuning Animations: Adjust animation options, duration, and rotation directions to achieve the desired visual effect. Use “With Previous” and set timings to “Repeat until End of Slide” for smooth animations.
- Efficient Object Duplication: Learn efficient methods to duplicate objects. The “Ctrl+D” command is handy for making copies and arranging them manually. Smart Cut and Paste can save you time in future presentations.
- Managing Duplicate Objects: Understand the difference between duplicating objects before or after applying animations. The tutorial provides insights into the animation pane organization.
- Delay Timing: To add delay timing between animations, select each object and adjust their timings. The tutorial demonstrates how to manage this effectively.
- Grouping Objects: Discover how to group 3D objects and perform actions on them collectively. Ungroup objects when necessary.
- Advanced Animation Techniques: Learn how to use the Animation Painter to efficiently duplicate animations across multiple objects, saving time and effort.
- Customize and Fine-Tune: Customize the animation settings for each object as needed. The tutorial shows how to apply and adjust animations for a polished result.
- Conclusion: The tutorial concludes by summarizing the key steps and offers tips for viewers to like, share, comment, and subscribe for future tutorials.
By following this comprehensive tutorial, you’ll be able to create a captivating 3D DNA effect in PowerPoint 2016, enhancing your presentation skills and making your content more engaging and memorable.
Watch 3D DNA Animation in PowerPoint Tutorial
Download 3D DNA Animation PowerPoint PPT
PPT Info.
PowerPoint Template
Character Animation
File Type: PPT / PPTX
File Size: 266KB
Number of Slides: 2
Download 3D DNA ANIMATION POWERPOINT TEMPLATE
DON’T FORGET TO LEAVE A RESPONSE.
Video Transcript:
In this tutorial, I am going to show you how you can harness the power of Paint 3D and PowerPoint 2016 to create a stunning 3D DNA effect. First of all, I’d like to tell you that if you have Windows 10, you might already have Paint 3D installed. If you are using the latest version of Windows 10, like I am (version 17134), Paint 3D should be available. It may also be available in earlier versions. However, if you want to create custom 3D objects, you’ll need some additional applications that allow you to customize objects as you require.
But, if you are planning to use the PowerPoint 3D models option, you can easily insert 3D models into PowerPoint. Keep in mind that you won’t be able to extensively customize these models. If you don’t see the 3D models option under the illustration section, you may need to check which version of PowerPoint 2016 is installed on your system. To do this, click on the “File” menu, then go to “Accounts.” Scroll down a bit, and you’ll find your version information. In my case, I have version 1805, and I also have a subscription to Office 365, which Microsoft kindly provided for one month for free. You can also click on “Office Update” and select “Update Now” to check if you can install the latest updates from Microsoft servers to access the 3D model options.
Now, let’s get started. Close any open files, open a new file by clicking “File,” then “New,” and choose a blank presentation. You can change the layout to black if you prefer. Now, let’s insert a custom 3D model created using Paint 3D. Go to the “Insert” tab, click the “3D Models” drop-down button, and select “From a File.” If you click on the 3D model at the top, it will open the 3D library with predefined models. In this case, I want to use a custom DNA shape, so I choose “From a File.” This allows me to insert the 3D model I created in Paint 3D. You should note that in Paint 3D, after creating your shape, you need to go to the “File” menu and select “Save As” to save your file as a 3D model. I saved these two files in the GLB format. When you insert a 3D model using the “From a File” option, PowerPoint 2016 will show you the compatible file types. This will result in a transparent object. If you apply a solid fill color to your slide, you’ll see that the object is separate from the background and doesn’t show any white or other colors.
Now, let’s adjust the size of the 3D model.
Do you want to apply the animation right now, or do you want to copy the objects first and then apply the animation to all the objects? It totally depends on your preference. First, let’s align the object in the center and middle of the slide. When you need to move the objects, if you hold down the Shift key, it will move the object in a straight line, making it easier to align the objects in the same position.
Now, regarding animation, you can choose to either apply the animation first and then duplicate the objects or duplicate the objects first and then apply the animation. This choice will create a slight difference in the outcome. I’ll demonstrate applying the animation first and then duplicating the objects.
After inserting the 3D model into your presentation, go to the “Animation” tab, and you’ll find new animations under the animation section. Click the “Add Animation” dropdown, and you’ll see a 3D section. I’m going to use the “Turntable” effect on this object. After selecting “Turntable,” open the animation pane and click “Play From” to start the animation from the beginning. You’ll notice that the animation is playing with a 20-second duration, but you may not see any noticeable change. This is because it’s moving on its anchor point, which is located right here.
To make the animation more visible, go to the “Effect Options.” By default, the spin rotation is set to “Right,” and the turntable rotation is set to “Right” as well. I want this rotation to be “Down.” Adjust it accordingly. I’d also like to start this animation “With Previous” with a duration of two seconds. Now, open the effect options by double-clicking on the effect, go to “Timing,” and set it to “Repeat until End of Slide.”
The second animation I’m going to apply is “Pulse.” You can also use transparency if you prefer, but I’m using the “Pulse” effect. Apply it “With Previous” with a duration of 0.50 seconds and set the timing to “Repeat until End of Slide.”
Now, let’s duplicate this object. To make several copies, you can use copy and paste commands, but you’ll have to arrange the objects in the same line manually. Alternatively, you can use the “Ctrl+D” command to make a duplicate, which is an easier way. However, you’ll still need to move the objects manually to position them similarly.
Here’s a more efficient method, which will save you time in future presentations: the “Smart Cut and Paste.” Move your mouse pointer near the border of the selection, hold down the “Ctrl” and “Shift” keys. Now, you’ll see a plus sign with the mouse pointer. If you drag and drop this object, it will not only make a similar copy of the object, but if you press the “F4” key, it will repeat your last command. This means it will place the object at the same distance and in the same position. Continue pressing “F4” to repeat the command. You can also press “Ctrl+Y” or click on the “Redo” button to repeat the same command. “Ctrl+Y” will redo the last action, as you can see, I accidentally pressed “Ctrl+D” earlier, which created a duplicate.
If you now press “Ctrl+Y,” it will repeat the last command, which was “Ctrl+T.” So if you’ve made some mistakes while using “Ctrl+D,” you’ll need to repeat the command once, and then you can use the “F4” key to apply it more efficiently. As I mentioned earlier, this is why I applied the animation first; when duplicating the object, it also duplicates the animations.
Now, let me demonstrate the difference when you duplicate objects before applying the animation. I’ll expand the thumbnail view, make a duplicate of your slide, and delete all the animations and objects except one. If I duplicate the object first and then apply the animation, let me delete all the animations again, and then apply both of the animations I applied in the first slide (Turntable with “With Previous” and a duration of 2 seconds, and Pulse with “With Previous” and a duration of 0.50 seconds, repeat until end of the slide). Now, select all the objects and apply the Pulse effect with “With Previous” and a duration of 0.50 seconds, repeat until end of the slide.
The difference is in the animation pane. In the first approach, you have both objects with their animations in a series, making it easier to manage and add delay timing between them. In the second approach, with objects duplicated before applying animation, you have animations for each object separately. This makes it more challenging to select and adjust animations when you need to add delay timing between them.
Now, the only thing left in this animation is to add delay timing. Adjust the timings by selecting each object and adding the desired delay. For example, point 10 seconds, point 24 for the third one, point 34 for the fourth one, point 44 for the fifth one, and so on. This is what you need to complete the animation.
Let me show you the slideshow, and here you have the animation.
Before I conclude this tutorial, let me show you one more thing. Make a duplicate of this slide, select all the objects on your slide, go to the “Format” tab, and group them. Now, go to the “Format” tab again, and you’ll see different options because all these 3D objects are now under a single group.
I’m going to click on the “Rotate” dropdown button and choose to rotate this object left 90 degrees. Now, ungroup them. I’m going to delete the objects that are outside the slide area. Apply the same animation to this one, “Turntable” with “With Previous” and a duration of 2 seconds. Open the effect options, and you can choose whether to add or remove smoothness. In the timing tab, set it to repeat until the end of the slide. The second animation is “Pulse” with “With Previous” and a duration of 0.50 seconds, and repeat until the end of the slide.
Now, I want to animate all the objects as I did with the top one, with a delay timing of 0.9 seconds between each of them. Instead of applying the same animation repeatedly, you can select the first one, click on the “Animation Painter,” and then click on the second one. This will duplicate the animation from the first object to the second one. You can repeat this step by selecting the second one and then clicking on the third one. However, that can take time. Instead of clicking the Animation Painter repeatedly, you can double-click on Animation Painter and then start clicking on the remaining objects. This will duplicate the animations on the following objects, and you’ll also see a preview before stopping, which can save you some time.
If you’re not interested in seeing the preview, you can click on the next object and then click again to quickly duplicate the animation using the Animation Painter. Later, you can add the delay timings between each set of the animation.
As I demonstrated in my previous presentation, I added a 0.10-second delay between each set of animations, as you can see. I hope you found this tutorial helpful. If you did, let me know by liking, sharing, and commenting. You can also subscribe to our channel and hit the bell icon to receive future notifications whenever I upload a new tutorial. Thanks for watching, and have a great day!