

Overview of Flipbook Animation
You might already have seen a lot of Flipbook Animation in PowerPoint most of which always use a simple technique of using Page Curl Transition Effect. You can see the example in Figure 1.1, where we have created the Flipbook Animation using the same technique in just 5 slides.
But before we go any further, let me remind you that this method is not so useful as the entire slide has the Page Curl effect, which means if you try to place some other objects near the book, like if the book is on top of a table then all the objects will also have the curl effect. So, you will not like to curl the table along with the book.
You can notice that the Green Background also has the curl effect, which doesn’t make this Flipbook animation realistic and that is why I am writing this article to let you know an alternative and realistic method of creating a Flip Book Animation in PowerPoint. So, let’s begin!
Flipbook Animation in PowerPoint Design Explanation
Look at the book shadow, which clearly indicates that the only pages are flipping not the entire slide and that is what makes this animation a bit different and more realistic than the others. Don’t get me wrong but this kind of flip or rotation is not possible in PowerPoint with simple 2D shapes objects as you may not find any technique or effect that can flip an object like that.
Don’t get me wrong as I should tell you that at the beginning of the article that the Book Pages are not 2D but 3D Objects that we first created in PowerPoint using Shape Tools and then imported into Paint 3D and converted as 3D Objects to later import and insert back into the slide.
How To Convert 2D Objects from PowerPoint to 3D Objects in Paint 3D?
- You can easily convert any of your PowerPoint 2D Shapes either single or grouped objects into 3D Shapes by just selecting the object, clicking Copy from Home Tab and then right-click Paste on Paint 3D Canvas and then clicking Make 3D from 3D Selection Pane as shown in Figure 1.3:
Converting 2D PowerPoint Shapes in 3D Objects in Paint 3D
- As usual, Microsoft doesn’t care about the Anchor Points, and a few years back I published a video on How To Use Custom Anchor Points in PowerPoint but that also doesn’t apply when you need to work with 3D Objects in PowerPoint.
If you will group a 2D Object with a 3D Object in PowerPoint then it will automatically convert both of them into 2D Shapes and you will lost all the 3D Options even if you are using PowerPoint 365.
PowerPoint drawbacks: No Anchor Point and can’t group 2D and 3D Objects together.
- In Figure 1.3, you can notice that after converting the object into 3D, you get further options for 3D Rotation which are not available for 2D Shapes but notice the Default Anchor Point of the object, which is in the middle of the object according to its height and width.
- As we need to rotate the 3D Page from the exact Left Middle, the page may look like a bind into a book, so we must apply a Custom Anchor Point to it and there is no way of doing this in Paint 3D as well.
- But the good thing about Paint 3D is that it has a Zoom Level of 6400%, which we will use to define a Custom Anchor Point for that, you need to draw another 3D Shape like an Oval and then group both of the objects to have a new Custom Anchor Point.
- Draw a 3D Oval to the left and middle but a bit far away from the 3D Flipbook Page. You can also draw a straight line to figure out the left middle point where you need to place the oval and later you can delete that line. See Figure 1.4:
Illustrating how to draw another object in the left and middle of a 3D Object
- But we don’t want that oval to be visible along with the page even if it is smaller in size but it will still be appearing on your PowerPoint Slide. Another drawback of Paint 3D is that it doesn’t have any Transparency or Opacity feature to make the objects invisible. But as I told you that we have a Zoom Level of 6400%, so we will use that to zoom into the oval and reduce its size as much as possible so exporting the 3D Object from Paint 3D and importing it into PowerPoint will make it almost invisible.
- Once you have the oval with the minimum possible smaller size, Zoom-Out and group both of the 3D Objects by pressing Select All followed by the Group command to have a new custom Anchor Point. See Figure 1.5:
Defining a small size oval in the left middle of the Flipbook Page then grouping both 3D Objects to define a new Custom Anchor Point
- Once you have your 3D Flipbook Page ready, click the File menu and then click Save-As, 3D Model, name the file and remember the saved location as shown in Figure 1.6:
How To Export As 3D Objects in Paint 3D
- Now, it’s time to Import a 3D Object into PowerPoint and then place it on top of the book by clicking on the Insert tab – 3D Models – This Device and then browse for the location where you saved the file in the previous steps. See Figure 1.7:

How To Insert 3D Models in PowerPoint
As you might know that 3D Models are either available with PowerPoint 365 or other latest Office Packages with Monthly Subscription or One Time Purchase. You can watch read more about using 3D Objects in earlier versions of PowerPoint even without a subscription.
How To Create Flipbook Animation in PowerPoint
- Once you have a single 3D Flipbook Page inside your presentation, it’s time to animate it! If you will select this object then you can find the 3D Model tab and a list of new 3D Animations in the Animation Tab like Arrive, Turntable, Swing, Jump & Turn, and Leave.
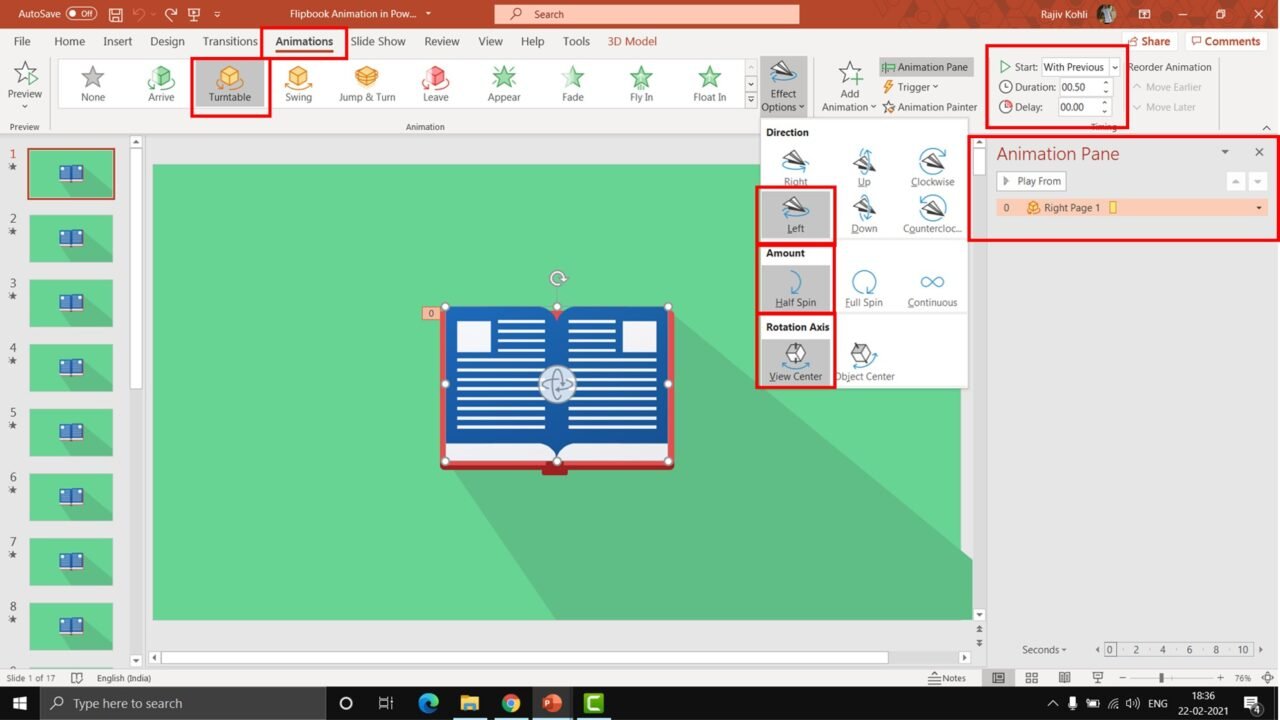
- As I always said what kind of animation effects and their effect options should be used totally depends on the object and how you want to animate it. As in our Flipbook Animation, we have placed one 3D page on the right side of the book and we want to flip that to the left side and so for that we are using the Turntable effect with Left Rotation, Half Spin -180 Degree, and Rotation Axis as View Center with Duration of 0.50 Seconds and playing With Previous.
- Finally, you just need to duplicate and place more 3D Pages on top of each other having different Delay Timings. You can use a different design for the left side page (we just replicate the same and Align on the Left Side with the Flip Horizontal command) and can change the Turntable effect to Right Rotation or
- You can just make more duplicate slides having different Transition Timings as we did in our Flipbook Presentation you can download them from the link below.
Hope you got The Teacher Point.
Download Flipbook PowerPoint PPT
PPT Info.
PowerPoint Template
Animated Flipbook Animation
File Type: PPT / PPTX
No. of Files: 4
File Size: 338KB / 43KB / 432KB / 16KB

Download Realistic Flipbook Animation in PowerPoint PPT
Download Flipbook Animation in PowerPoint 2D Design
Download Flipbook Animation in PowerPoint with Character on Top
Download Realistic Flipbook Animation in PowerPoint using Page Curl Transition
DON’T FORGET TO LEAVE A RESPONSE.


Great Post!
Highly descriptive blog, I liked that a lot. Will there be a part 2?
Whoa! This blog loos exactly lie my old one! It’s on a
completely different subject but it has pretty much the same page layout annd design. Outstanding choice of colors!