
In today’s digital age, visual presentations play a crucial role in conveying information effectively. Trigger Animations in Microsoft PowerPoint is a popular tool for creating such presentations, but many users may not be aware of the extent to which they can bring their slides to life with animations. In this tutorial, we’ll explore how to trigger animations on a mouse click in PowerPoint, and to make it even more engaging, we’ll share a video tutorial that visually demonstrates the process.
Understanding the Basics
Before we delve into the step-by-step instructions, let’s grasp the core concept: the ability to trigger animations when you click your mouse on specific elements in a PowerPoint presentation. Essentially, this feature empowers you to create interactive and dynamic slides that engage your audience effectively.
Step-by-Step Guide
1. Creating a New Presentation
The tutorial starts by creating a new blank presentation and inserting a shape (rounded corner rectangle) to serve as the trigger element for animations.
2. Applying Animations
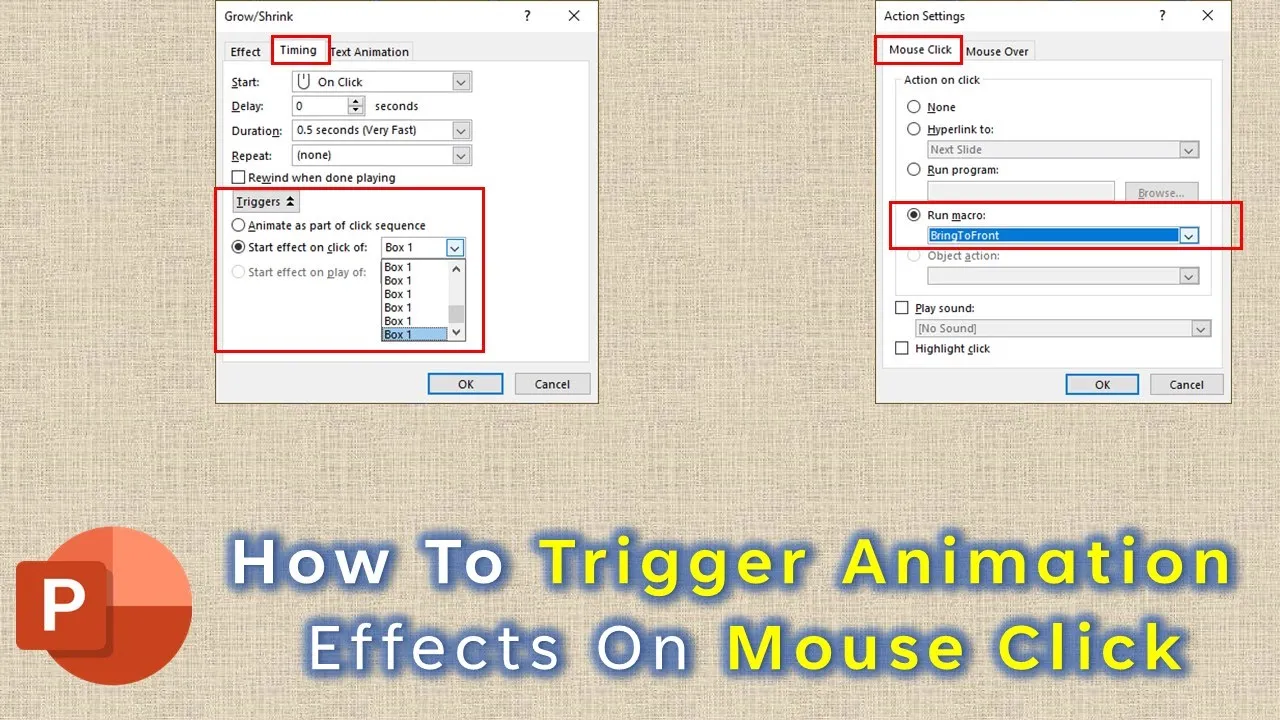
The next step involves applying animations to the shape. These animations include “Grow/Shrink,” “Motion Path,” and “Spin,” each with specific properties like duration, delay, and “Play With Previous.”
3. Setting Triggers
The key to triggering animations on a mouse click lies in the “Trigger” feature. You associate each animation with the shape by choosing “On Click Of,” ensuring they activate when the specific shape is clicked.
4. Duplicating Elements
For a more visually appealing and interactive presentation, you’ll duplicate the shape to create a series of clickable elements on your slide. The tutorial provides a quick tip for duplicating shapes efficiently.
5. Adding a Background Image
To enhance the visual experience, insert a background image that adds depth and aesthetics to your presentation.
6. Hiding the Trigger Element
Since clicking anywhere on the slide ends the presentation, you’ll learn how to hide the trigger elements and only display the background image initially.
7. Preventing Unwanted Clicks
To prevent accidental clicks on the background image, the tutorial demonstrates how to apply an action setting to it. This ensures that clicking the image does nothing except register a click without ending the show.
8. Advanced Option: Visual Basic Code
The video tutorial also touches on an advanced option for those with coding skills. Using Visual Basic, you can create more complex interactions, such as resizing and animating elements on mouse over.
Conclusion
Creating interactive and engaging PowerPoint presentations is a valuable skill that can captivate your audience. This tutorial on triggering animations on a mouse click in Microsoft PowerPoint offers a step-by-step guide to achieving this, visually enhancing your slides. Whether you’re a novice or an experienced user, there’s something for everyone in this tutorial.
So, don’t hesitate to watch the video tutorial provided above for a more in-depth and hands-on understanding of the concept. It’s a fantastic resource to take your PowerPoint presentations to the next level, adding a dynamic touch to your storytelling.
Remember, practice makes perfect, and the more you experiment with these techniques, the better your presentations will become. Thank you for reading, and we hope you find this tutorial helpful in your PowerPoint journey.


