
Welcome to “The Teacher’s” comprehensive tutorial on Line and Paragraph Spacing in Microsoft Word 2016! In this guide, Rajiv will take you through the intricacies of Word’s line and paragraph spacing, helping you gain a solid understanding of how to format your documents effectively.
Understanding Line and Paragraph Spacing
Microsoft Word has a distinct way of distinguishing between lines and paragraphs, and this knowledge is crucial for making precise spacing adjustments in your documents. By default, Word considers every press of the Enter key as the end of a paragraph and the beginning of a new one.
To visualize these distinctions, you can enable the “Show/Hide” feature from the Home tab, which reveals paragraph marks, line breaks, spaces, and tabs in your document. These marks do not get printed and are purely for your reference.
Avoiding Extra Enters
One common mistake is overusing the Enter key to create new lines within a paragraph. This not only affects paragraph spacing but can also lead to formatting issues. It’s recommended to use the Enter key at the end of each paragraph, letting Word automatically wrap text to the next line when necessary.
Adjusting Paragraph Spacing
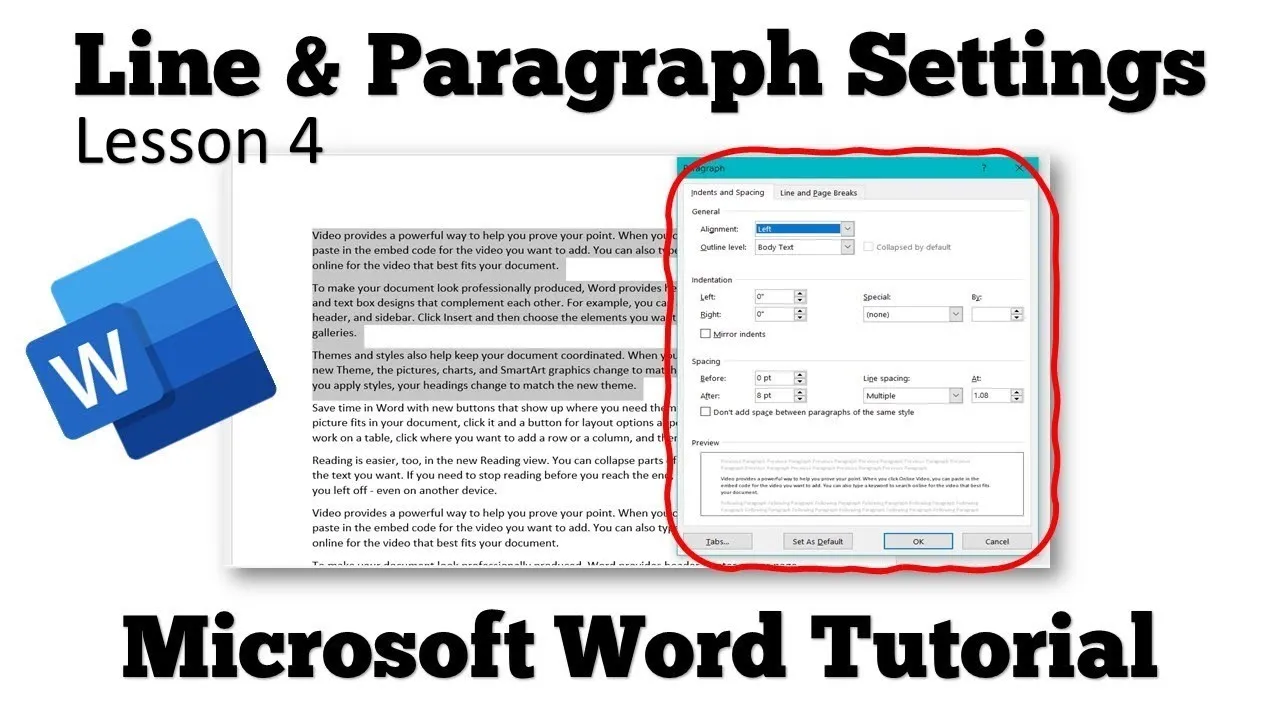
To adjust paragraph spacing, you can select the paragraphs you want to modify and navigate to the Paragraph section under the Home tab. Here, you have options to add space before or after paragraphs. Word will apply these spacing adjustments based on its interpretation of paragraphs.
Applying Line Spacing
Line spacing determines the space between each line of text. You can select the entire document and adjust the line spacing using predefined options such as 1, 1.5, 2, or 3. Choose the spacing that best suits your document’s needs. You can also experiment with these settings to achieve the desired layout.
Fine-Tuning Line and Paragraph Spacing
For more control over spacing, you can access the Line Spacing Options dialog. This dialog allows you to specify before and after spacing for paragraphs. Additionally, you can choose whether to add line spacing between paragraphs of the same style, which is particularly useful for differentiating special paragraphs like quotes.
Using “At Least” and “Exactly” Line Spacing
When you select “At Least” or “Exactly” line spacing, Word switches to a point system, similar to font sizes. “At Least” sets the minimum line spacing required to accommodate the largest font or graphic on a line. “Exactly” allows you to specify the exact line spacing, useful for precise formatting.
By the end of this tutorial, you’ll be able to manipulate line and paragraph spacing in Microsoft Word 2016 with confidence, ensuring your documents are not only well-organized but also visually appealing.
In this tutorial, you’ve learned the ins and outs of line and paragraph spacing in Microsoft Word 2016. It’s an essential skill for anyone who wants to create well-formatted and visually appealing documents. By understanding how Word differentiates between lines and paragraphs, avoiding unnecessary line breaks, and fine-tuning spacing, you can take control of your document’s appearance and readability.
Remember that using the right spacing not only enhances the aesthetics of your document but also improves its readability. So, the next time you’re working on a Word document, pay attention to line and paragraph spacing, and make your content stand out.
Thank you for joining us in this tutorial, and we hope it has been helpful. If you have any questions, suggestions, or feedback, feel free to leave a comment. Don’t forget to like and share the video with your friends, and subscribe to “The Teacher’s” channel for more informative lessons. Wishing you a Happy New Year and successful document formatting in Microsoft Word!


