
Hello, and welcome back to “The Teacher” channel! In Windows 10, you can easily monitor your internet and network data usage, which is particularly important for metered internet connections where you are charged based on your data usage. However, one common concern is that the built-in data usage app doesn’t provide an option to reset your data usage or set specific time and date ranges. In this tutorial, we’ll show you how to manually reset your internet data usage in two straightforward methods.
Method 1: Resetting Data Usage in Safe Mode
One way to reset your internet data usage is by booting your computer into Safe Mode without networking support. Follow these steps:
- Restart your computer.
- During the startup process, press and hold the “Shift” key.
- Keep holding the “Shift” key until the Windows Advanced Options menu appears.
- Select “Troubleshoot” and then “Advanced options.”
- Click on “Startup Settings” and then “Restart.”
- When your computer reboots, you will see a list of startup settings. Press the “4” key on your keyboard to boot into Safe Mode.
- Once in Safe Mode, the network and internet data usage won’t be tracked.
- After you’ve booted into Safe Mode, restart your computer again to exit Safe Mode and return to normal operation. Your data usage will be reset.
Method 2: Manually Resetting Data Usage in Normal Mode
If you prefer to reset your data usage without entering Safe Mode, you can follow these steps:
- Right-click on the network icon in the system tray (usually located in the bottom-right corner of your screen).
- Select “Open Network and Sharing Center.”
- In the Network and Sharing Center, click on “Change adapter settings” on the left-side panel.
- Click on “Wi-Fi” or “Ethernet,” depending on your internet connection type.
- Click on “Change adapter options” from the top bar.
- Right-click on the network adapter that you are using for your internet connection and select “Disable” from the context menu. This will temporarily disable your network connection.
- Open File Explorer and navigate to the “Windows\System32\SRU” folder. You can do this by entering “C:\Windows\System32\SRU” in the File Explorer address bar.
- Once inside the SRU folder, delete all the contents of the folder. These files store data usage information.
- After clearing the SRU folder, right-click on the network adapter again and select “Enable” to re-enable your network connection.
- Close all open windows and return to your desktop.
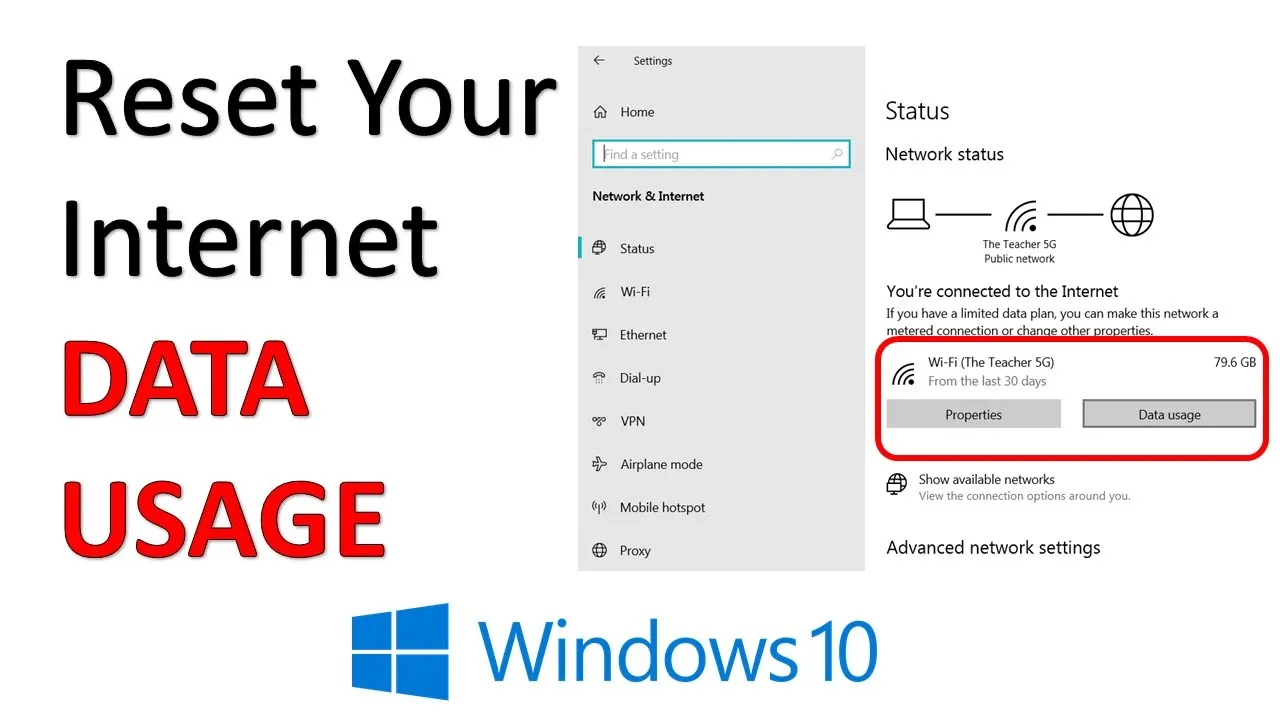
- Open the “Settings” window in Windows 10.
- Click on “Network and Internet.”
- Select “Data Usage.”
You’ll find that all the values in the Data Usage app have been reset to zero.
Conclusion:
While Windows 10’s built-in Data Usage app lacks a built-in reset feature, you can manually reset your internet data usage using the methods described above. This can be especially useful for users with metered internet connections who want to keep track of their data usage over specific time periods. We hope you found this tutorial informative. Please let us know by hitting the “Thumbs Up” button, leaving comments, or sharing this video with your friends. Visit our channel page for more helpful lessons. Thanks for watching, and take care!


